|
Mar 02, 2024
|
Whenever I write a blog, I receive a lot of love from my readers. But this time, I also got some comments. One of them was how to make cake toppers with Cricut. Then, I decided to create a detailed guide on this topic, and eventually, I started making custom cake toppers at home.

In addition, I wanted to create multiple cake toppers so that I could use them on my loved one’s birthday. Wait, don’t worry. I will not take you through the numerous cake toppers, but I will make one unique topper and show you how you can create it yourself with Cricut.
So, are you ready to get started with me? If yes, then let’s join me on a board and follow the steps carefully to eliminate any mistakes. Let’s get started!
What Items Do I Need to Create Cake Toppers?
Well, there are some materials you will be required to make a fantastic cake topper. So, in this tutorial, I am using the following materials or tools. Hence, I want you to gather these items before you move to how to make cake toppers with Cricut. Here are the items needed to make cake toppers:
● Cricut machine
● Blue cardstock
● Black adhesive vinyl
● Hot glue gun
● Scissors
● Transfer tape
● Adhesive cutting mat
● Yellow cardstock
● Red cardstock
● Double-sided foam squares
● Clear prism sticks
● Bearly art glue
● Colored confetti
● Acetate
● Thin double-sided foam tape
How to Make Cake Toppers With Cricut Machines?
Creating a cake topper on Cricut is usually easy. Yes, you heard that right; even a beginner can create it easily if they follow the steps diligently. The blog primarily targets beginner crafters who want to start using Cricut and those who want to learn to make a cake topper with Cricut.
I will take you through the steps below to create the beautiful cake toppers that will make your jaw drop. If you are ready to start, you have to start following the steps below:
Step 1: Create or Add a Design for a Cake Topper
Okay, let us create a design on Design Space. Below, I have provided you with the steps to create a cake topper design on the Cricut app:
Go to your software and start a new project.
2. Next, click on the Upload button on the left panel and click on Upload Image.
3. After that, hit the Browse option.
4. Look for the birthday cake topper on the device, select it, and hit Upload.
5. Now, you need to click on the Upload Image button.
6. Then, choose your image and then click the Add to Canvas option in the bottom right corner.
7. Finally, click on Ungroup to separate the pieces of the cake topper.
Step 2: Cutting a Cake Topper Design
Once everything is aligned with what you want, click on the Make It button from the top right corner. Below, let me explain to you how to make cake toppers with Cricut:
Ensure your Cricut machine is turned on, and all the cake topper pieces should be sorted by color onto your cutting mat.
After that, hit the Continue button. Next, you will be prompted to connect your Cricut Design Space to your Cricut machine. Now, you have to choose the materials from the materials list. Once done, you have to place the material on the Cricut cutting mat and then insert it into the machine.
Then, click on the blinking Start button on your Cricut and proceed to cut.
After cutting, you have to unload the mat and cut the remaining cake topper pieces. Next, you have to assemble all of them. To assemble them, you have to follow the next step.
Step 3: Assemble Cake Topper Pieces
Here, I am adding double-sided tape to this red cardstock.
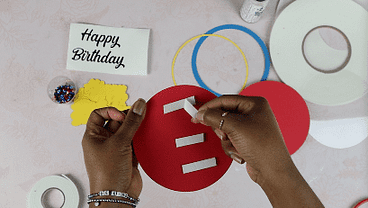
Now, use thin double-sided foam tape and place it around the edge of the topmost red layer.
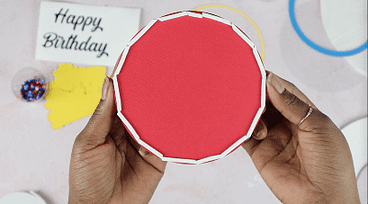
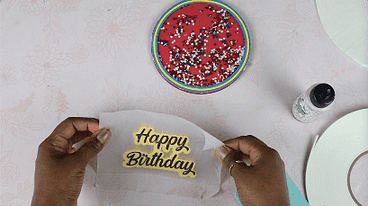
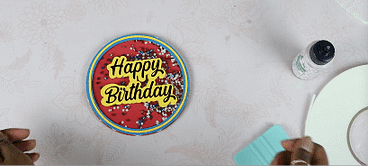
We are doing this because we will be adding some confetti, which should not come out in any way. Finally, add the confetti and apply the plastic film to the cake topper. Afterward, apply the cake topper you made.
Here you go!
Conclusion
Make sure you gather all the essential supplies or tools before you learn how to make cake toppers with Cricut. Through this blog, I have explained everything stepwise so that it will be easier for everyone to understand. No matter whether you are a beginner or a pro crafter, the easy-to-follow steps will get you everything you need for making cake toppers with Cricut.
FAQs
Question 1: Which materials should I use to make cake toppers?
Answer: There are many cake toppers available in the market out there. Some of them are made of plastic or acrylic. With a Cricut, you can choose any material that quickly cuts the plastic or acrylic. However, I prefer making wood, acrylic, and cardstock cake toppers. I avoid plastic for personal reasons; otherwise, you can use it until it is compatible with your Cricut.
Question 2: Which Cricut machine should I use for making cake toppers?
Answer: I think almost all Cricut machines are compatible with making cake toppers. Still, I would recommend you avoid using the Cricut Joy or its advanced version, Joy Xtra, to make a specific size of cake topper. As these machines are already small in size, you need to use a machine that can make the apt size of cake toppers that fit your cake. Otherwise, you can make cake toppers on these two machines as well.
Question 3: Is there any specific size for cake toppers?
Answer: I don’t think there is a specific size for creating cake toppers on Cricut until and unless you use Joy or Joy Xtra. These two machines may not make a certain size of cake toppers, but the rest of the machines are very well compatible with creating a large size of cake toppers. In short, there is no specific size for creating such toppers. Besides, cake toppers are usually smaller in size.
Source: how to make cake toppers with Cricut
Visit here for Information: Cricut.com/setup